
Rooming the Timetable
There are several methods available for rooming the timetable. The rooming screen, accessed via Construction > Rooming, allows for both manual and automatic rooming. Manual rooming can also be done via timetables.
Preparation
Before commencing rooming, the following steps are recommended:
- In Data entry > Rooms, check that
a. the capacity of each room is correct
b. the unavailability is entered for rooms that are not always available
b. all specialist rooms have been flagged with Y in the Specialist column
c. the teachers who must teach in the one room as much as possible are listed in the HomeRoomOf column for their specific room. Also check that the room is part of the room set for each of the teacher's classes.
- In Data entry > Courses, ensure that all courses have rooms listed in the Rooms column where required. If a course does not have any rooms listed, classes of that course will be scheduled into any of the general rooms (those not flagged as specialist rooms).
- In Data entry > Classes, if a class is to be scheduled into a specific room, use the Room req column to enter the room code followed by 'only'. This will automatically scheduled that class into that room for every period. If a class does not require a room, enter 'none' in the Rooms column. This will remove it from the Rooming screen.
- Check Construction > Pre-dive checks for any issues related to rooming and address these where possible.
Filtering the Rooming screen
- Go to Construction > Rooming to open the rooming screen.
- Here you will see filters for Campus, Faculty, Year level and Rotation. Select the required options from each filter dropdown to refine the set of classes to be roomed.
- Note that only 1 rotation can be roomed at a time.
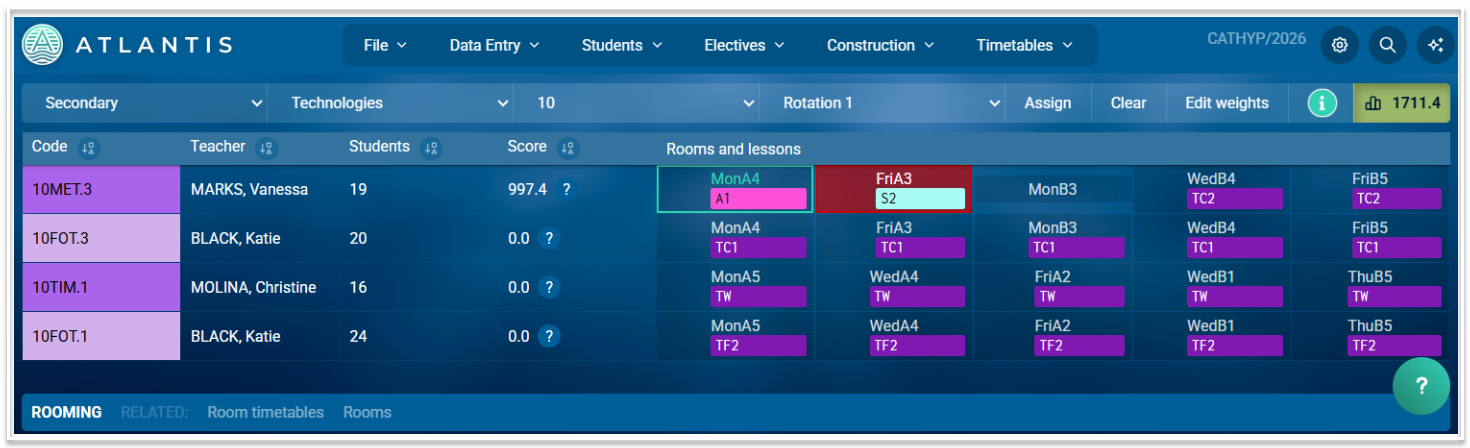
- Here is an example of a filtered screen showing the Secondary campus, the Technologies faculty, for Year 10, in rotation 1.
- You will see one row per class.
- The information displayed for each class includes the assigned teacher, the number of students, the score and the rooms assigned for each period (or not, as for 10MET.3 on MonB3).
- Once rooms are assigned, the rooms with the highest score will be at the top. The higher the score the worse the rooming. You can click on the question mark beside each score to see what has contributed to the score.
- The rooms are coloured according to what faculty owns them.
- Lessons which have been allocated to a fallback (lower priority) room will have a light border around them (as shown for 10MET.3 on MonA4)
- Lessons which have been allocated to a room that is too small, or to a specialist room from another faculty, will be displayed with a red background (as shown for 10MET.3 on FriA3)
Algorithm Weights
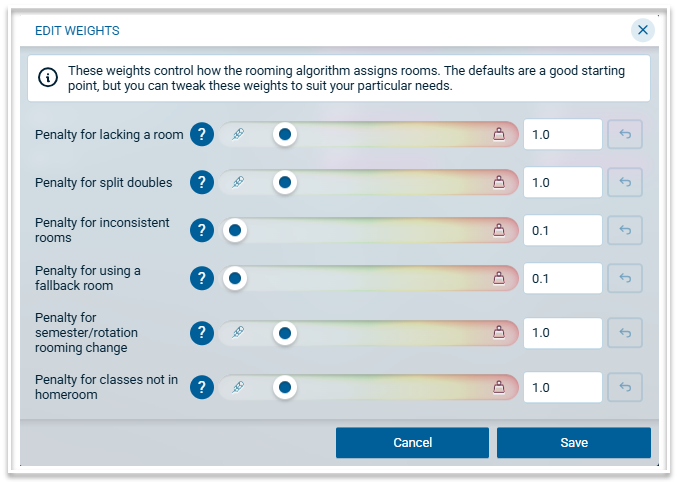
Before using the auto rooming algorithm, it is beneficial to check the Weights to ensure they will meet your requirements. To check and adjust the weights, select the 'Edit Weights' button. The default weights are a good starting point but you may wish to adjust one or more if the algorithm is not rooming as you would like. For example, to ensure consistent rooming for year long courses between semesters/rotations, increase the Penalty for semester/rotation rooming change.
Automatically Assigning Rooms
When you have filtered the screen to show a set of classes to be roomed, you can use the 'Assign' button to allocate rooms to those classes only. If you have not filtered the screen, using the 'Assign' button will allocate rooms to all classes. The algorithm will assign rooms according to the room sets for each course or class, room availability, room capacity and the weights that have been set.
Manually Assigning Rooms
- To assign rooms manually for a class, click on any period to open the room selector.
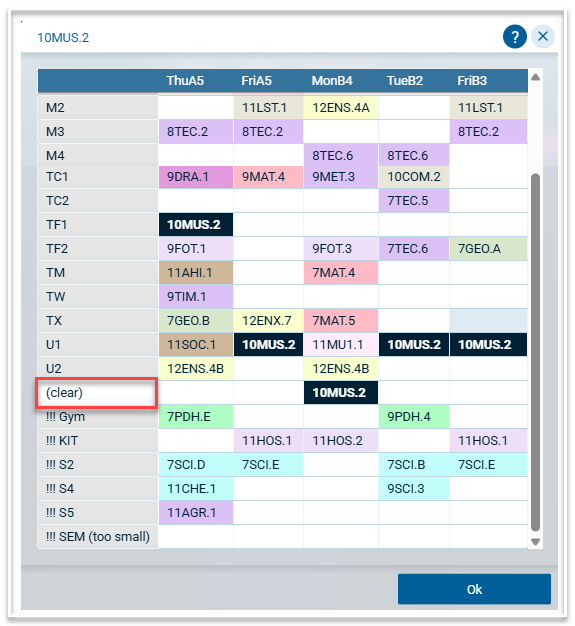
- The room selector displays the selected class in black with white text.
- Periods which have not been allocated a room appear in the (clear) row.
- Periods which have been allocated show in the row of the allocated room.
- To allocate a class to a room, simply click in the cell which is in the row of the room and the column of the period.
- To clear the allocated room, either click in the (clear) row for the required period or click on the class in the period that is to be cleared.
Rooming via Timetables
Rooms can be allocated to classes via year timetables by selecting the allocated teacher or the pencil icon when no teacher has been allocated. This will open a dual selector for both rooms and teachers. Select the Rooms tab to open the room picker.
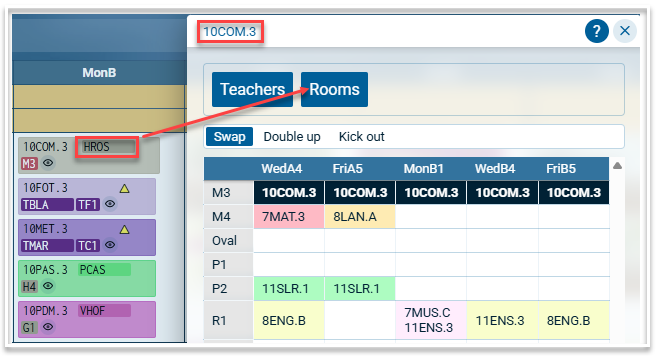
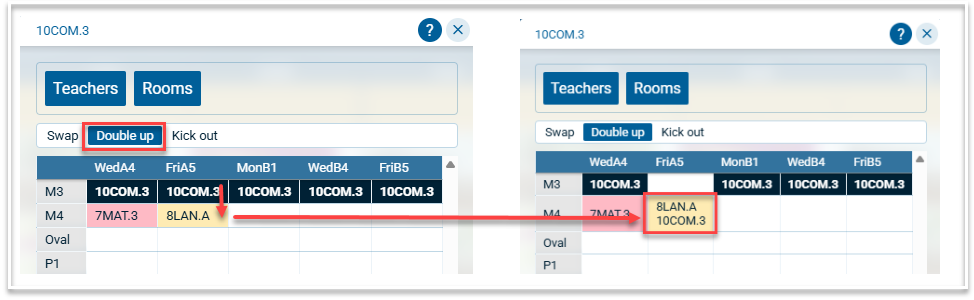
This picker works in a similar fashion to the picker in the Rooming screen with three additional options for allocating classes: Swap, Double up and Kick out.
Using Swap
When 'Swap' is selected, moving a class from one room to another room that is occupied, will cause the rooms for those two classes to swap. In the example above, clicking on room M4 on WedA4, which is occupied by 7MAT.3, will move 10COM.3 into M4 and move 7MAT.3 into M3. If the selected room is not allocated in a particular period, clicking on a room that is occupied will cause the class in that room to become unallocated. This is because there is no room for it to swap with.
Using Double up
When 'Double up' is selected, allocating a class to a room that is occupied will cause the two classes to occupy the same room, thus creating a room clash.
Using Kick out
When 'Kick out' is selected, selecting an occupied room will cause the class in that room to become unallocated.
The Rooming by Day Timetable
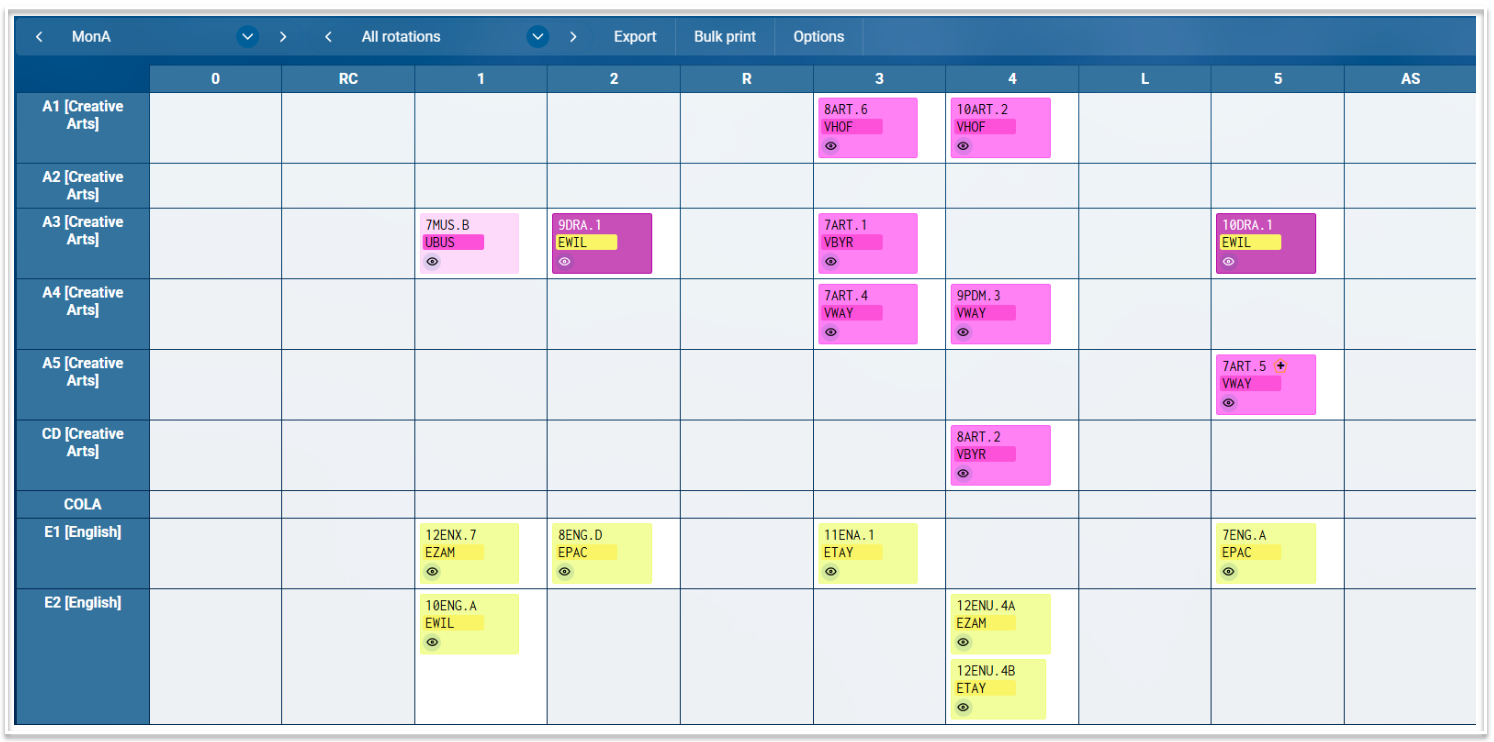
The Rooming by day timetable allows you to manually manipulate rooming per day by dragging and dropping classes between rooms. This timetable is useful for manually resolving room clashes. It has a rotation filter that includes an 'All rotations' option, allowing you see rooming across rotations for each day of the cycle.
Rooming Rotations
When you have rotational classes in your file, you will need to room each rotation separately. Rooming is not automatically carried over from one rotation to the next. However, as mentioned above, increasing the Penalty for semester/rotation rooming change will encourage the algorithm to consistently room year long courses across rotations. There may be some inconsistencies due to the new rotation classes having different rooming requirements, however, these can be adjusted manually if required.
Each rotation's rooming solution is unique. This means you can, for example, load Rotation 2's rooming and clear it without clearing Rotation 1's rooming. When a new rotation is roomed using the Assign function, all rooming will initially carry over and be used as a starting point for the algorithm. Typically, when a class doesn't end or begin at this changeover, Atlantis will keep all the same rooms, but this is not guaranteed because sometimes a rotational class has a greater need for one of the rooms that class is using.
Important: If you Assign rooming for a new rotation with clashes in the previous rotation, those clashes will degrade the algorithm. Spend the time and resolve room clashes before rooming the new rotation.
Analysing Rooming
When you have completed rooming, check the scores for each class in Construction > Rooming and address any issues. You can also check for any issues by going to Construction > Evaluation. Look for the sections on room clashes and missing rooms.