Covers: Making Changes
The Main Screen
To access the main screen, go to Work > Main screen. Here you will be able to add absences, events and room swaps. These will be displayed in the left hand panel, which can be filtered to show one or all of these options. When an absence, event or room swap is entered, classes and events that require a replacement teacher or room will be displayed in the right hand panel, ready to be covered.
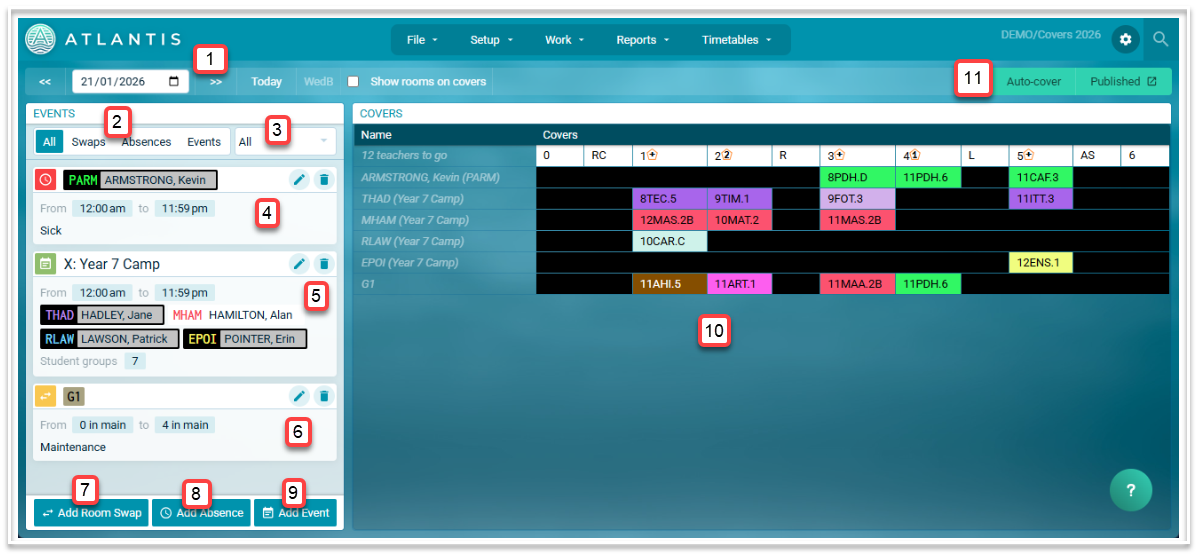
- This is the date information. You can use the calendar to select a date or use the forward and back arrows to navigate to a new date. Selecting 'Today' will return you to the current date. The cycle day is displayed for the selected date. This is not editable.
- Use these filters to filter the information in the left hand panel. You can select All, Swaps, Absences or Events.
- This is the campus filter.
- Absences will display the absent teacher's code and name. Note the code is displayed in the colour of the faculty to which the teacher belongs. Also displayed are the duration and the reason for each absence.
- Events will display the name of the event, the duration of the event, the teachers on the event and the students groups attending the event.
- Room swaps display the room code, the duration of the swap and the reason for the swap.
- Select 'Add Room Swap' to make room changes.
- Select 'Add Absence' to record teacher absences.
- Select 'Add Event' to create events
- All classes requiring replacement teachers and rooms are displayed here
- Auto-cover can be used to assign covers automatically.
Adding a staff absence
- Select the required start day from the date picker in the top left hand corner of the screen.
- Select ‘Add Absence’ which will display the following window.
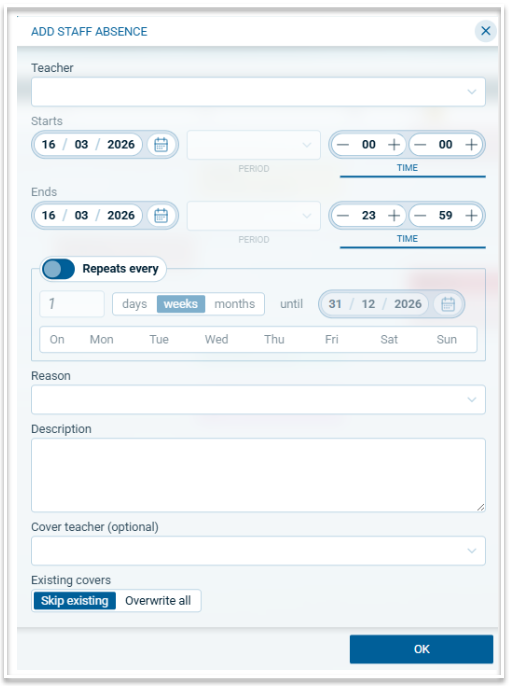
- Select the absent staff member from the drop down in ‘Teacher’. You can use the search bar to locate the teacher.
- The Start and End dates will be populated automatically. Use the date picker to change the end date if the absence will be longer than one day.
- For a partial day absence, select the start and end periods or times.
- Select the required reason
- Add a description if required
- If the cover teacher is known at this stage, they can be entered in ‘Cover teacher’, e.g. when a casual teacher has been employed to cover all of the absent teacher’s classes.
- Select to keep existing covers or overwrite them
- Select OK
Adding a recurring absence
- To add a recurring absence, toggle 'Repeats every' to activate the recurrence.
- Enter the number to repeat i.e. every ‘x’ days, week or months
- Select days, weeks or months. If weeks is selected, select the day or days of the week on which the absence will occur.
- Add the end date. This will automatically set the end date in the 'Ends' section above, which will become read only
- Add the rest of the absence information as required
- Select OK
Adding an Event
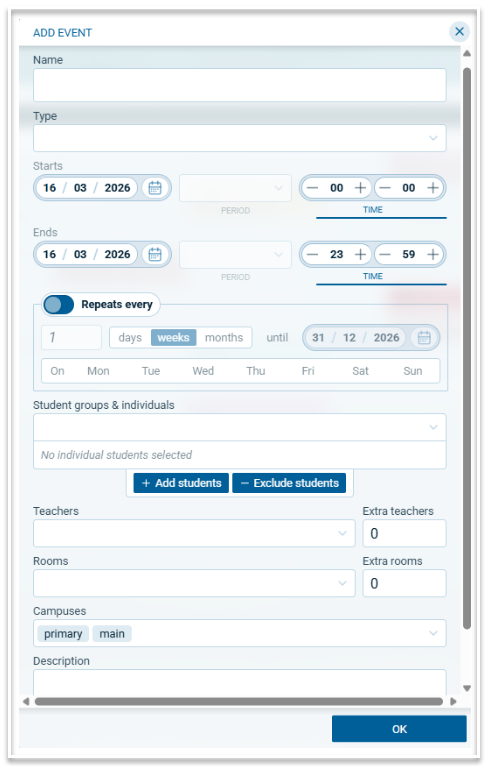
- Select ‘Add Event’ which will open the following window:
- Enter the Name of the event
- Select the type of event. This is important as different types act differently when displaying covers. The event types currently available are Excursion, Incursion, Detention, Cancellation, Exam, Work experience, Camp, Task, Meeting and Supervision. More will be added when required.
- Adjust the start and end times if required. For partial day events, select the start and end periods or times.
- Select the student group or groups attending the event. This is not required for teacher only events. Groups can be whole year groups or individual classes.
- Select the teachers attending the event. If additional teachers are required, add the required number in the Extra teachers field. These will display in the Covers table where the additional teachers can be added.
- Select the rooms required for the event. If additional rooms are required, add the required number in the Extra rooms field. These will display in the Covers table where the additional rooms can be added.
- For multi-campus schools, all campuses are displayed in the Campus field. Remove any campuses for which the event does not apply.
- Add a description if required.
- Select OK.
Adding a recurring event
- To add a recurring event, toggle 'Repeats every' to activate the recurrence.
- Enter the number to repeat i.e. every ‘x’ days, week or months
- Select days, weeks or months. If weeks is selected, select the day or days of the week on which the absence will occur.
- Add the end date. This will automatically set the end date in the 'Ends' section above, which will become read only.
- Enter the rest of the event information as required
- Select OK
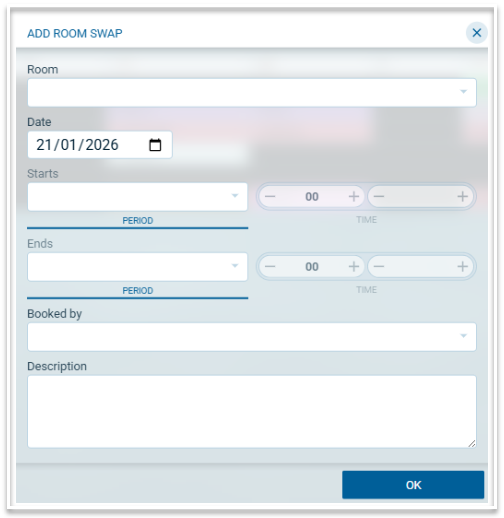
Adding a room swap
Room swaps can be used to re-room classes due to rooms being unavailable or when a teacher requires a different room for one or more periods. Note that room swaps may be automatically created due to room bookings. To create a room swap, follow these steps.
- Select ‘Add room swap’ which will open this modal
- Select the room that requires changing
- Change the date if a different date is required
- For a partial day room swap, select the start and end periods or times
- If the room swap is a result of a room booking, the person who made the booking will be displayed in the ‘Booked by’ field.
- Add a description if required.
- Select OK
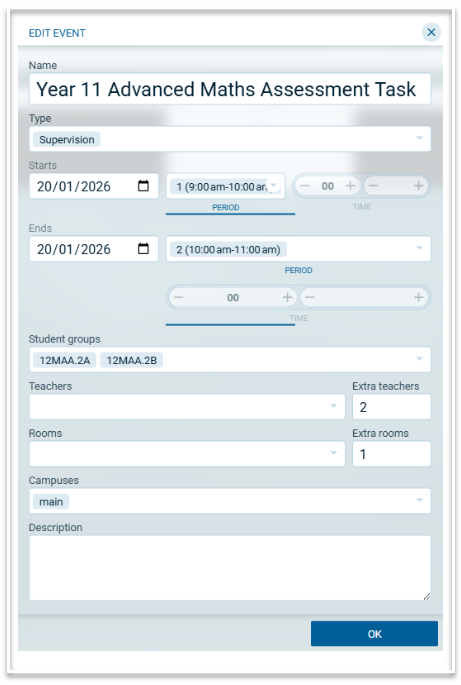
Adding a Supervision schedule
When a group of students require supervision outside of their normal classes, a supervision schedule can be created using one of the specific event types. For example, supervision may be required for an assessment task for students from different classes.
To create a supervision schedule, select ‘Add Event’ and use the event type Exam or Supervision. Select the start and end times and the required student groups. Add the required number of extra teachers and extra rooms. Select OK.
Here is an example: