
The Exams Module
Accessing the Exams module
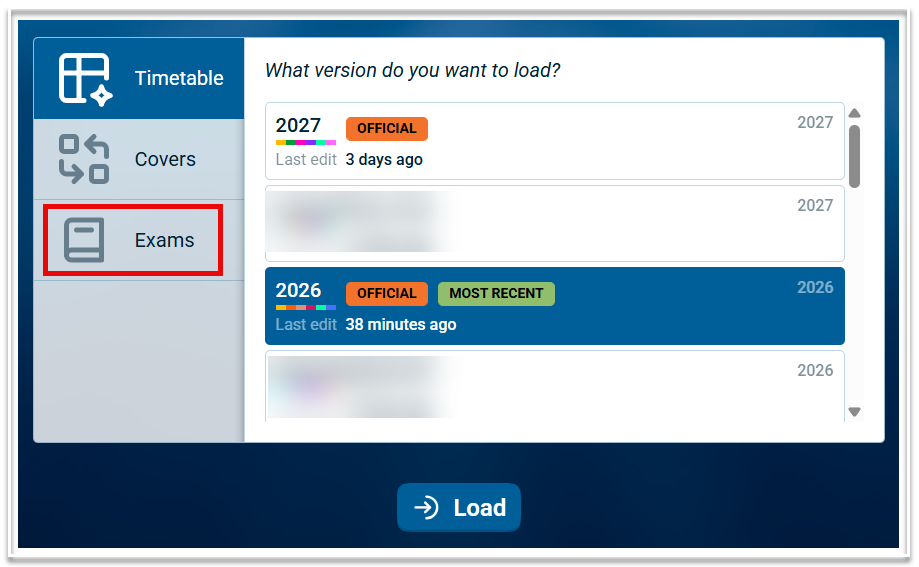
Once licensed for Exams, the module will be listed when loading a dataset. Users with the 'Exam weeks' role are able to access the module. Select 'Exams' then Load.
Navigating the Exams Module
The Exams module has 4 menus:
- File: From this menu you can
a) load a different module or data set
b) Log out - Data entry: This menu contains the following sub menus: Manage datasets, Setup, Exams, Student special provisions and Rooms.
- Build: This is where you create exam timetables. It also contains reports.
- Timetables: For viewing and printing student exam timetables.
Data Entry
Managing Datasets
- To create an exam dataset, go to Data entry > Manage datasets.
- In the Exam datasets table, add the name of the exam block and indicate which year level(s) will be included.
- Note that the dataset Id will be created automatically.
Setup
- To setup an exam block, go to Data entry > Setup.
- From the dropdown in the top left corner, select the required dataset.
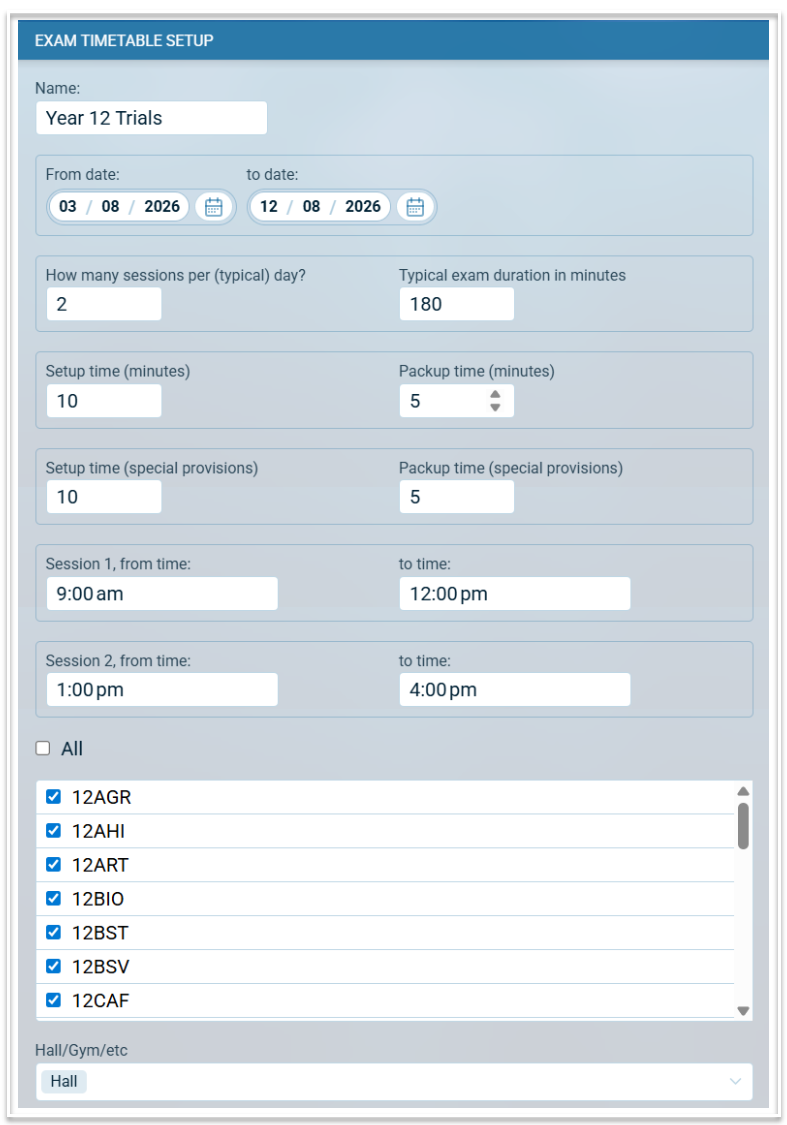
- Complete the form as follows:
Name: this is pre-populated with name of the exam dataset but can be edited.
From date and To date: add the first and last dates on which the exam block falls
How many sessions per (typical) day: Enter the maximum number of sessions on any day. If some days have fewer sessions, the extra sessions can be marked as unavailable.
Typical exam duration in minutes: Enter the duration for the majority of the exams. Individual exam durations can be edited in the data entry screen.
Setup time and Packup time: Enter the time in minutes for the period before and after each exam where supervisors set up and collect exams.
Setup time (special provisions) and Packup time (special provisions): Enter the time in minutes for the period before and after each special provisions exam where supervisors set up and collect exams.
Session times: Enter the start and end times for each session. This does NOT include the set up and pack up times. Setup times are added before the start time of an exam and pack up times are added after the end time of an exam. Session times can be modified per day via the Build screen.
Subjects: Select the subjects that require an exam. Use 'All' to select every listed subject.
Hall/Gym/etc: If all exams are to be scheduled in the one room, add the room code here. This will automatically populate the room in the exam events in Covers when the exam block is committed. Leave blank if the exams will be scheduled across multiple rooms. The room can be assigned to exams in the Build section or via the exam events in Covers.
Exams
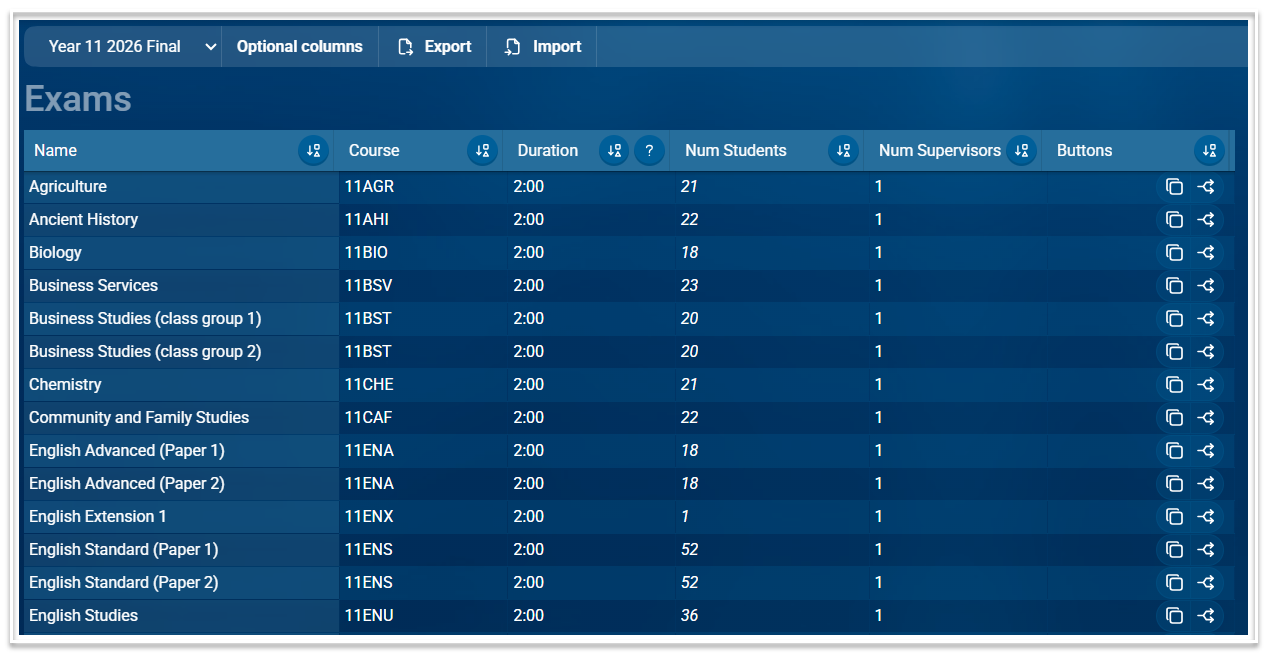
Exams of subjects selected in the setup form will appear in the Exams table in Data entry > Exams.
This table has the following columns:
- Name: The name of the exam. In the first instance this will be the Course name but it can be edited if required. For example, after adding a second exam for Biology, you may wish to add 'Theory' to one exam and 'Practical' to the other.
- Course: This will be the Course code.
- Duration: This is the official duration of the exam. The value will be inherited from the Setup form but can be changed if required. It does not include the setup or pack up times.
- Num Students: This read only column will display the total number of students in all classes of the course.
- Num Supervisors: Enter the number of supervisors required for each exam. Once the exam timetable is committed to Covers, each exam event will reflect the number of supervisors in the 'Extra teachers' field.
- Buttons: There are two buttons available in this column; one to add a second exam for all students in a course and one to add a second exam for a course where different classes will sit each exam. Selecting the second button will activate the optional 'Classes' column where different classes can be specified for each of the exams for that course.
Optional Columns
- Id: This is a read only field showing the system-generated internal Id for each exam
- Classes: Enter a wildcard string (or a comma-separated set of wildcard strings) to reference the classes to include in an exam.
- Exam Board (e.g. NESA, IB): A free text field.
- Option Code (for international schools)
- Component Code: (for international schools)
- Teacher: This will be populated from the timetable. Where multiple classes exist for a course, the teacher column will list the teacher of the first class only.
- Start time: This will be populated once a schedule is generated and can be changed if required.
Further Information
- Select the required dataset from the filter in the top left corner
- This table can be exported as a .csv file using the Export button.
- Data can be imported using a .csv file. See this article for information on importing data.
- The table can be sorted on any column by clicking on the sort icon in the column header. Blank fields will be displayed at the top.
- Columns can be resized.
- The Search bar can be used to find and filter data in the table.
Student Special Provisions
Students who require exam special provisions can be flagged in the Special Student Provisions table in Data entry > Student special provisions. This table can be filtered by year level and contains the following columns:
- Code (of the student)
- Name (of the student)
- Year (of the student)
- SpecialProv: When 'Y' is entered in this column for a student, a separate exam event for each of the student's exams will be created when the Exam schedule is committed to Covers.
- Notes: A text field to add information regarding a student's special provisions.
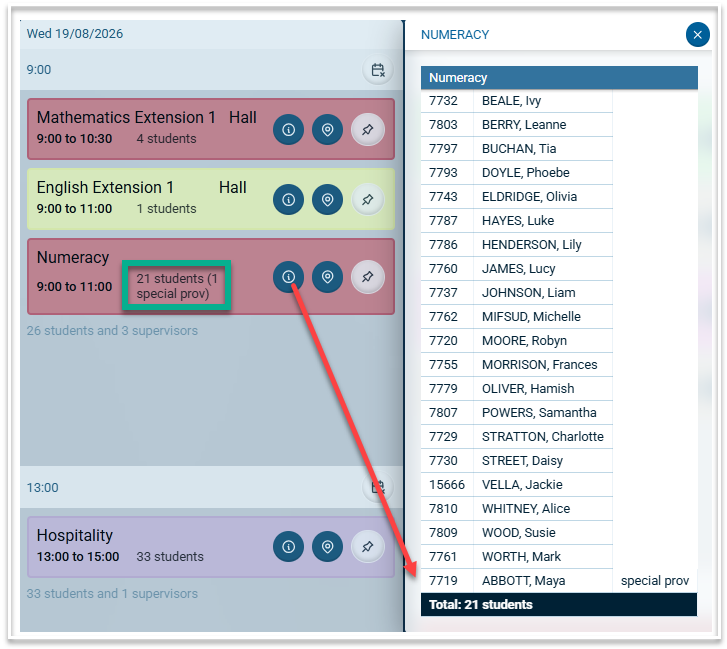
Note that a separate special provisions exam is not created in the exam schedule but is automatically added to the existing subject exam. The number of students with special provisions in an exam will be displayed and the list of students for an exam will have the students with special provisions listed at the end.
Rooms
This table lists all rooms from the timetable file. Additional exam rooms can be entered if required. The Normal Capacity column is a read only column reflecting the capacity of each room from the timetable file. The Capacity at exam time column can be edited if the capacity is different during an exam block. All rooms listed in this table will be selectable when doing the rooming via the Build section.
Creating the Exam Timetable
- For manual creation or automatic generation of an exam timetable, go to Build > Build.
- Select the required exam dataset from the list in the dataset dropdown.
- Sessions can be made unavailable using the icon in the top right corner of the session slot
- Unscheduled exams will appear on the right hand side in the Unassigned exams section.
- Exams are colour-coded with the faculty colour and display the number of students in the exam. Use the information icon on each exam to see a list of the students sitting the exam.
- English exams are automatically placed in the first session of the first day of the exam block. These can be moved if required.
- Drag and drop exams to move them from one session to another.
- Exams can be pinned to a session using the pin icon. Pinned exams will not move when generating or clearing.
- The exam schedule can be created automatically by selecting the Generate button in the toolbar.
- To clear unpinned exams from the timetable, use the Clear button in the toolbar.
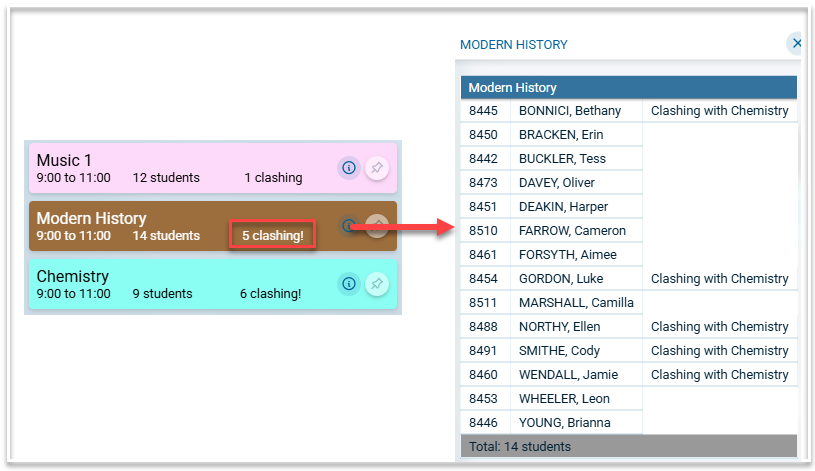
- When there are clashes with students in an exam slot, the number of students clashing will be displayed on each exam. The student list will show the exam they are clashing with.
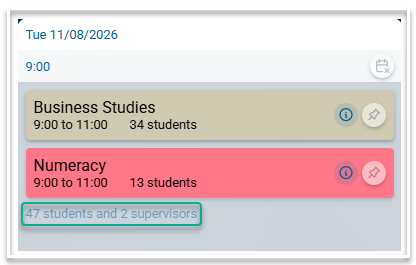
- Based on the information in Data entry, the number of supervisors scheduled for each session will be displayed This is a total of the supervisors assigned to each exam. The total number of students across all exams in a session is also displayed.
- The exam timetable can be exported to Excel using the Export button in the toolbar
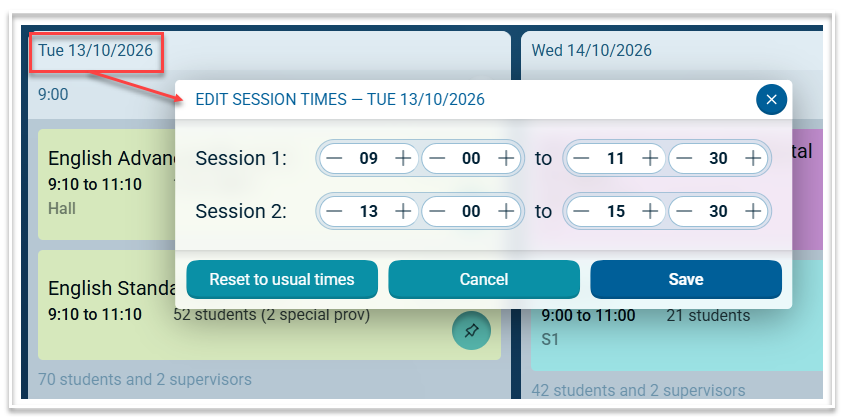
- Session times per day can be edited by clicking the date at the top of a day.
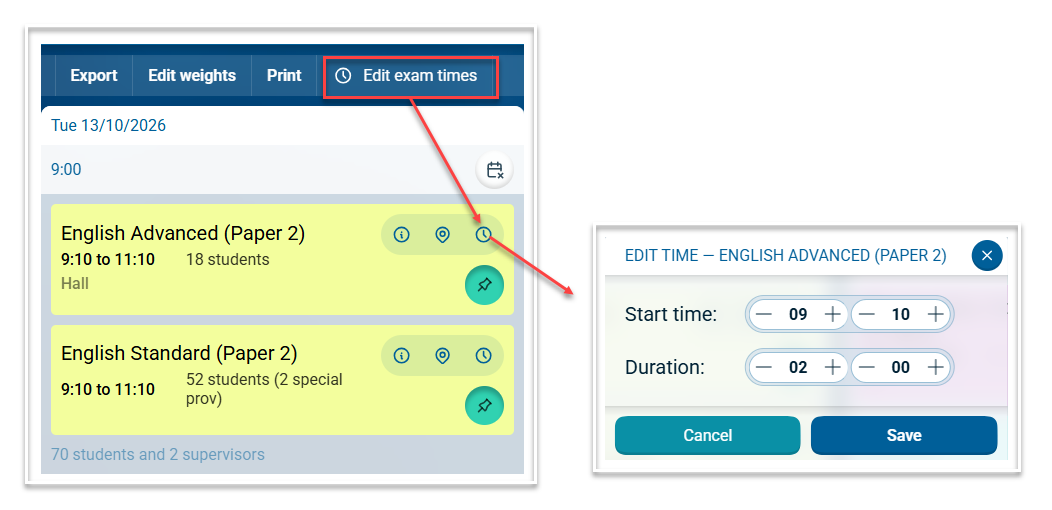
- Individual exam start times can be edited by selecting the 'Edit exam times' button. This will activate an additional icon on each exam. Selecting this icon will enable a modal where the start time and the duration can be edited.
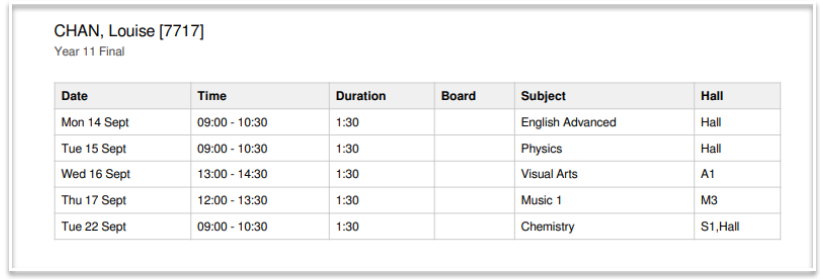
- Individual student timetables are displayed in the Timetables menu. They can be selected by exam block then by student name. Exam timetables can be printed/exported as pdf documents.
Rooming Exams
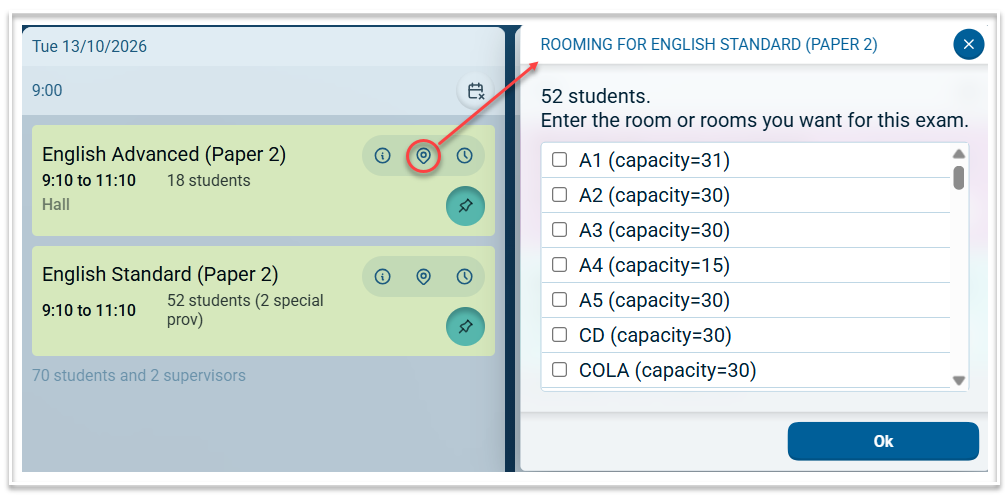
- Use the room icon to select the room or rooms required for each exam. Multiple rooms can be selected per exam and the same room can be selected for multiple exams in the same session without creating a room clash.
Supervision in Covers
- When the exam timetable is finalised, using the Commit button in the tool bar will send the information to Covers where an exam type event will be created for each exam on its scheduled day. These events will include the number of supervisors and the selected rooms as specified in the Exam module.
- The exam events can be edited to add additional supervisors or change rooms if required.
- Exam events in Covers allow the same room to be scheduled across multiple exams at the same time. These are not recorded as room clashes.
- A cancellation event is created for the entire duration of the exam block to cancel the timetabled classes of the relevant year group(s). This will create in lieu loads for teachers of those cancelled classes who can be used to supervise exams. These cancellation events can be deleted if not required.